
Anti-condensation membrane test: checks before installation
Published on 08.08.2026 · Isoflect Insulation technical team
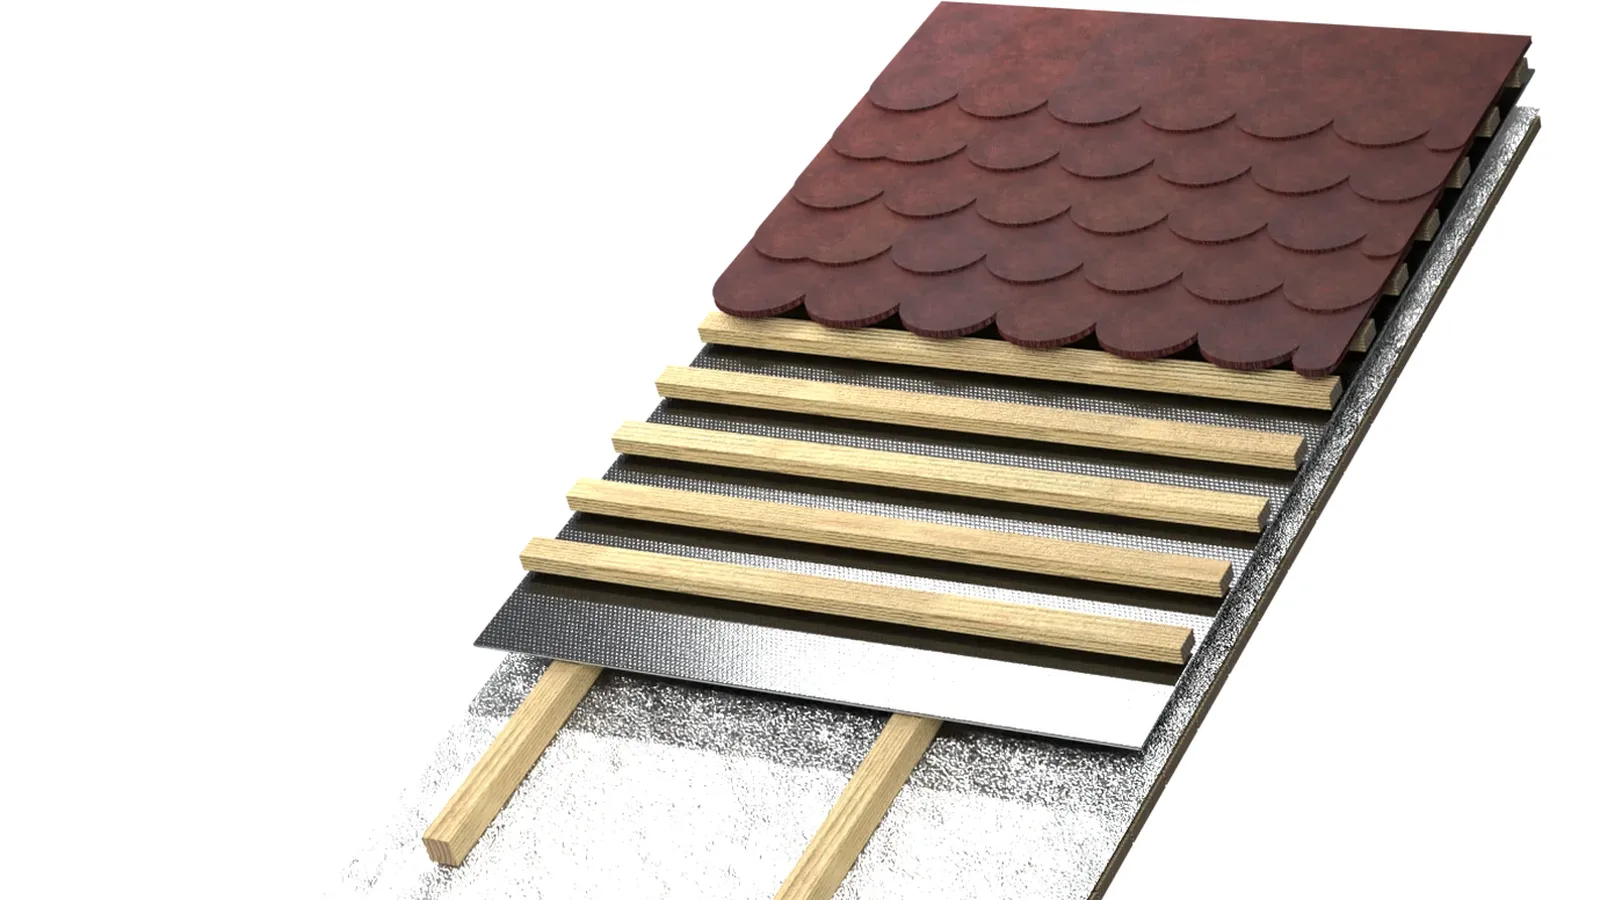
A membrane installed beneath the roof covering may look perfect on the first day and nevertheless allow condensation to appear in the insulation after the first cold season. A correctly performed anti-condensation membrane test does not simply mean pouring water onto the material. It means verifying whether the chosen membrane, the sealing details and the installation form a system capable of controlling water from the exterior and the vapour produced inside the dwelling.
For a habitable attic, an insulated attic or a lightweight roof, this check can prevent heat losses, damp wool, degraded timber and costly interventions. A good anti-condensation membrane works in a precise position within the roof build-up. If it is incorrectly chosen or installed, the performance of the entire insulation system becomes unpredictable.
What an anti-condensation membrane test actually examines
An anti-condensation membrane, also frequently referred to as a roof diffusion membrane, is generally installed over the rafters and beneath the roof covering. Its role is to stop water that may accidentally penetrate beneath tiles, metal sheeting or other roof coverings, while allowing vapour to escape from the roof structure to the exterior.
The relevant test verifies three things: water resistance, vapour diffusion capacity and the continuity of the installed layer. The material may have very good specifications on the technical data sheet, yet an insufficient overlap, an unsealed perforation or an unprotected area at the chimney can cancel out the benefit of the membrane.
The difference between the anti-condensation membrane beneath the roof covering and the vapour barrier inside the habitable attic is essential. The former protects the thermal insulation from water and promotes drying towards the exterior. The vapour barrier, or the membrane with variable vapour control, is installed on the warm side of the insulation, towards the interior, in order to limit the ingress of moisture from the living space. The two layers are not substitutes for one another.
Checking the material before installation
Before taking the rolls up onto the roof, check the label, the technical data sheet and the physical condition of the material. An intelligent choice starts from measurable parameters, not merely from the trade name of the product.
Water resistance and membrane integrity
The membrane must be delivered free of cuts, holes, accidentally bonded areas or damaged edges. Check every roll, particularly if it has been transported or stored on site. A small perforation can become a direct path for wind-driven water beneath the roof covering.
Water resistance is expressed in the technical data sheet by means of classifications and laboratory tests. It is not necessary to reproduce these tests at home, and an improvised test with a powerful jet of water may even be misleading. The membrane is not the final roof covering and should not be assessed as a tarpaulin permanently exposed to water pressure. The useful check on site is visual: intact material, correct overlaps and all penetrations carefully treated.
Vapour permeability
For a membrane installed directly over the thermal insulation, vapour diffusion is decisive. In technical terms, look at the Sd value, that is, the equivalent vapour diffusion resistance. A low Sd value indicates a highly vapour-permeable membrane, capable of helping the structure dry towards the exterior.
There is no single value suitable for every roof. The choice depends on the type of roof covering, the roof pitch, the ventilation and the complete build-up of the habitable attic. In a permanently heated habitable attic, where the indoor air produces vapour through cooking, showers and normal activities, the balance between the diffusion membrane and the interior vapour control layer is all the more important.
Mechanical strength
The membrane must withstand the tension applied during installation, the pressure of the counter-battens and the normal loads on the roof. Check the values for tensile strength and nail tear resistance. These data matter particularly on roofs with complex geometry, on steep pitches, in windy areas or where the installation includes numerous details around roof windows, chimneys and valleys.
A thinner membrane is not automatically weak, and a thicker one is not automatically the correct solution. The comparison must be made on the basis of declared performance and compatibility with the system, not merely on thickness or the price per roll.
Testing the anti-condensation membrane after installation: what to check on the roof
The best check is carried out before the roof covering permanently conceals the membrane. Viewed from the outside, the surface must be continuous, without sagging areas, pronounced creases or excessive tension. The membrane must direct any infiltration towards the eaves, not create pockets in which water can collect.
The overlaps between strips must be observed in accordance with the manufacturer's instructions. In exposed areas, on low pitches or at sensitive joints, additional sealing with a compatible tape may be necessary. The tape chosen must adhere to the membrane in question and withstand temperature variations. An ordinary tape, applied to dusty or damp surfaces, does not provide reliable performance.
Carefully check the details around chimneys, roof windows, vents, antennas and pipes. Every penetration must be detailed so that water is discharged over the membrane, not behind it. At chimneys, the safety distances from components that become hot must also be observed, in accordance with the requirements of the chimney system and the applicable regulations.
At the eaves, the membrane must discharge water into the designated area without blocking the air intake required for ventilating the roof covering. At the ridge, the detail must support air extraction and prevent the ingress of rain or snow. These two ends of the roof make the difference between a correctly ventilated cavity and one that retains moisture.
Signs that the system is not functioning correctly
Condensation does not always appear as visible droplets. The first indications may be a persistent damp odour, stains on plasterboard finishes, timber that darkens in colour, or thermal insulation that has settled and feels cold to the touch. In winter, frost or droplets on the underside of the membrane may indicate either a vapour-tightness problem on the interior side, insufficient ventilation, or a combination of the two.
Do not automatically assume that the anti-condensation membrane is the cause. If warm vapour from the dwelling passes through the joints of the vapour barrier and reaches the cold zone of the roof, it will condense regardless of the quality of the external membrane. In this case, the correct intervention is to restore airtightness on the interior side, including at the junctions with the walls, electrical installations and roof windows.
When it is worth checking the entire insulation build-up
A high-performance roof is not the sum of rolls purchased separately. It is a system: roof covering, ventilation space, anti-condensation membrane, thermal insulation between and below the rafters, vapour control layer, sealing tapes and interior finish. If one of the layers is chosen without reference to the others, the risk of condensation remains.
In renovations, first check what already exists in the roof. An old bituminous membrane, almost impermeable to vapour, completely changes the way in which the insulation must be designed. In some situations, additional ventilation or rebuilding the layer sequence is safer than adding thick insulation over a structure that can no longer dry.
For new habitable attics, material packages configured for the installation area simplify the choice and reduce incompatibilities between membranes, tapes and insulation. Isoflect can provide technical guidance in selecting a solution adapted to the pitch, the type of roof covering and the way in which the space will be used.
A properly conducted test does not look only for visible defects. It confirms that water is discharged, vapour is controlled and the insulation has the conditions necessary to remain dry for years. This is the starting point for a habitable attic with absolute comfort and for a structure protected in every season.
Not sure which Isoflect product suits you? See Reflectiva Roof Pro or open the package configurator to find out exactly what you need and in what quantity.